终端开发
Android开发之FileProvider相关知识 Android 权限 及设置描述信息 局域网开启 Android ADB 无线调试 安卓开发那些事之开发规范 安卓组件化之组件通信及拦截 安卓开发那些事之版本管理 安卓组件化之持续集成与自动构建 安卓组件化之组件调试和运行 安卓组件化之组件管理(导入、依赖、升级) 安卓组件化之框架设计 安卓开发那些事总纲 Android Textview 对HTML 的支持 appium 爬坑之基于 Chromedriver 测试 Android webview Linux 搭建 Android 编译构建环境 appium爬坑之iMac上基于appium多设备并发测试 appium爬坑之iMac上appium环境搭建及使用真机测试Android项目简介 H5页面通过指定Schema拉起Android应用 Android JSBridge简介 Gradle插件开发系列之发布gradle插件到开源库 Gradle插件开发系列之开发第一个gradle插件 Gradle插件开发系列之gradle插件调试方法 Gradle插件开发系列之总纲 一款检查Gradle依赖配置是否冲突的插件 记一次升级Android Gradle Plugin后databing编译报错填坑经历 iMac上 Xcode 相关设置及常见问题 iOS开发 -- 首次使用Xcode运行iOS项目代码 使用Android Studio开发可独立运行(runnable)混淆过的Jar程序 Android安装包精简系列之资源精简 Android安装包精简系列之图片优化 Android安装包精简系列之为什么要优化精简安装包 Android安装包精简系列(总纲) Android安装包精简系列之图标转字体 Gradle 相关资料汇总 Android编译常见错误解决 Android编译编译速度提升 终端基于gradle的开源项目运行环境配置指引 制作终端产品演示的gif 一个关于APK Signature Scheme v2签名的神奇bug定位经历 如何随apk一起打包并使用SQLite SDK热更之gradle插件(如何在SDK代码中自动插桩及如何生成补丁包) 关于Android的APK Signature Scheme v2签名相关的资料汇总 封装HttpURLConnection实现的简单的网络请求库 一款基于Java环境的读取应用包名、签名、是否V2签名等基本信息的工具 Android的APK Signature Scheme v2签名及一款基于Java环境的校验工具介绍 如何使用Eclipse开发可执行Jar程序,并生成混淆过的jar程序 Android 相关的学习资料整理(持续更新) macOS(Sierra 10.12)上Android源码(AOSP)的下载、编译与导入到Android Studio Android开发常用命令备忘 Google也看不下去被玩坏的悬浮窗了么? Android开发常用工具资源 SDK热更系列之概述(持续整理编辑中~) SDK热更系列之SDKHotfix待优化点 Android 终端开发相关的一些神图(持续更新) SDK热更系列之Demo项目介绍概述 SDK热更系列之Demo体验方法 SDK热更系列之如何获取应用在当前设备上的so对应的指令集 Gradle Android插件使用的中那些特别注意的点 Experimental Plugin User Guide(From Android Tools Project Site) 基于Android Studio使用gradle构建包含jni以及so的构建实例 基于Instrumentation框架的自动化测试 - Android自动化测试系列(四) Instrumentation框架介绍-Android自动化测试系列(三) 关于终端设备的设备唯一性的那些事之MAC地址 关于终端设备的设备唯一性的那些事之IMEI Android 检查应用是否有root权限 ant常见错误解决方案 Gradle介绍 iMac上Android Studio 相关设置及常见问题 ADB命令系列之再说ADB 再看Android官方文档之分享 再看Android官方文档之Fragment&数据保存 再看Android官方文档之Activity&Intent 再看Android官方文档之ActionBar和兼容性 ADB命令系列之 adb shell input(Android模拟输入)简单总结 再看Android官方文档之建立第一个APP Android开发调试常用工具 ANR(网络资料整理) Java参数引用传递引发的惨案(又一次Java的String的“非对象”特性的踩坑经历) android.view.WindowManager$BadTokenException,Unable to add window Android签名校验机制(数字证书)及命令行获取 keystore 公钥等信息 Robotium二三事-Android自动化测试系列(二) Robotium介绍-Android自动化测试系列(一) Android开发中遇到的那些坑 Eclipse使用中部分经验总结 Android中关于Nativa编译(NDK、JNI)的一些问题 Android简单实现的多线程下载模块 Android内存耗用之VSS/RSS/PSS/USS ADB命令系列之 Advanced Command URL编码中的空格(编码以后变为+) Android MD5后 bye数组转化为Hex字符串的坑(记一次为女神排忧解难的经历) Android学习之路 ADB命令系列之 Base Command Android Log的那些坑…………开发工具
Linux JDK 安装、卸载、路径查看 替换Jcenter,发布开源代码到 Sonatype Maven Central 使用 gitstats 分析代码仓库 使用 Jekyll 搭建技术博客并部署到 CentOS 服务器 开发中常用的文档管理、云端笔记等效率工具介绍 iMac(OS X)常用图片处理工具介绍 使用 Octopress 搭建技术博客并使用腾讯云静态网站托管 使用腾讯云静态网站托管个人博客 使用 Jekyll 搭建技术博客 iMac上安装Python2.7 和 Python3 iMac 使用自带的 Apache 启用本地web服务 发布开源代码到jcenter Gradle环境变量那些事 iMac搭建jekyll本地环境 iMac(OS X)开发和使用中经验汇总(持续更新) iMac配置基于crontab的定时任务 iMac配置支持读取NTFS硬盘 新iMac机器装机及开发环境搭建攻略 git常用命令整理(已包括branch、tag等持续更新~) iMac使用过程中的简单故障解决 iMac上RubyGems相关的问题汇总 开发中常用的一些Chrome插件介绍 iMac(OS X)日常开发中各种代理设置方法汇总(shell、Android Studio、gem、npm) Markdown格式优化及使用技巧 iMac下制作含透明度图片及判断图片透明度 iMac(OS X)中设置大小写敏感的分区并切换 Linux & MacOS中一些常用命令备忘 iMac(OS X)搭建私有maven仓库,提供Nexus Responsitory镜像 iMac(OS X)El Capitan 更新遇到的那些坑 vi常用命令 iMac(OS X)常用开发工具介绍 iMac(OS X)不可或缺的套件管理器 —— Homebrew 开发环境通用设置 windows中一些常用命令备忘 问题定位之快速模拟请求 Ant中的SVN 使用 Markdown语法简介 SVN 常用命令标签
总结 8
web 9
资源 4
android 50
adb 6
bug 7
常用工具 8
工具 30
SDK 22
Android 13
个人作品 7
测试 7
iMac 13
gradle 7
旅行 8
tags 53
apk 5
自动 3
替换Jcenter,发布开源代码到 Sonatype Maven Central
「 开发工具 」 —— 2021年03月25日
在平时的开发中,经常会写一些通用的代码,为了方便自己后续使用,也为了方便更多的人,大都会选择发布到github或者jcenter等一些开源库。之前一直是使用jcenter,结果活久见,前几天发布的时候登录,竟然看到了这:
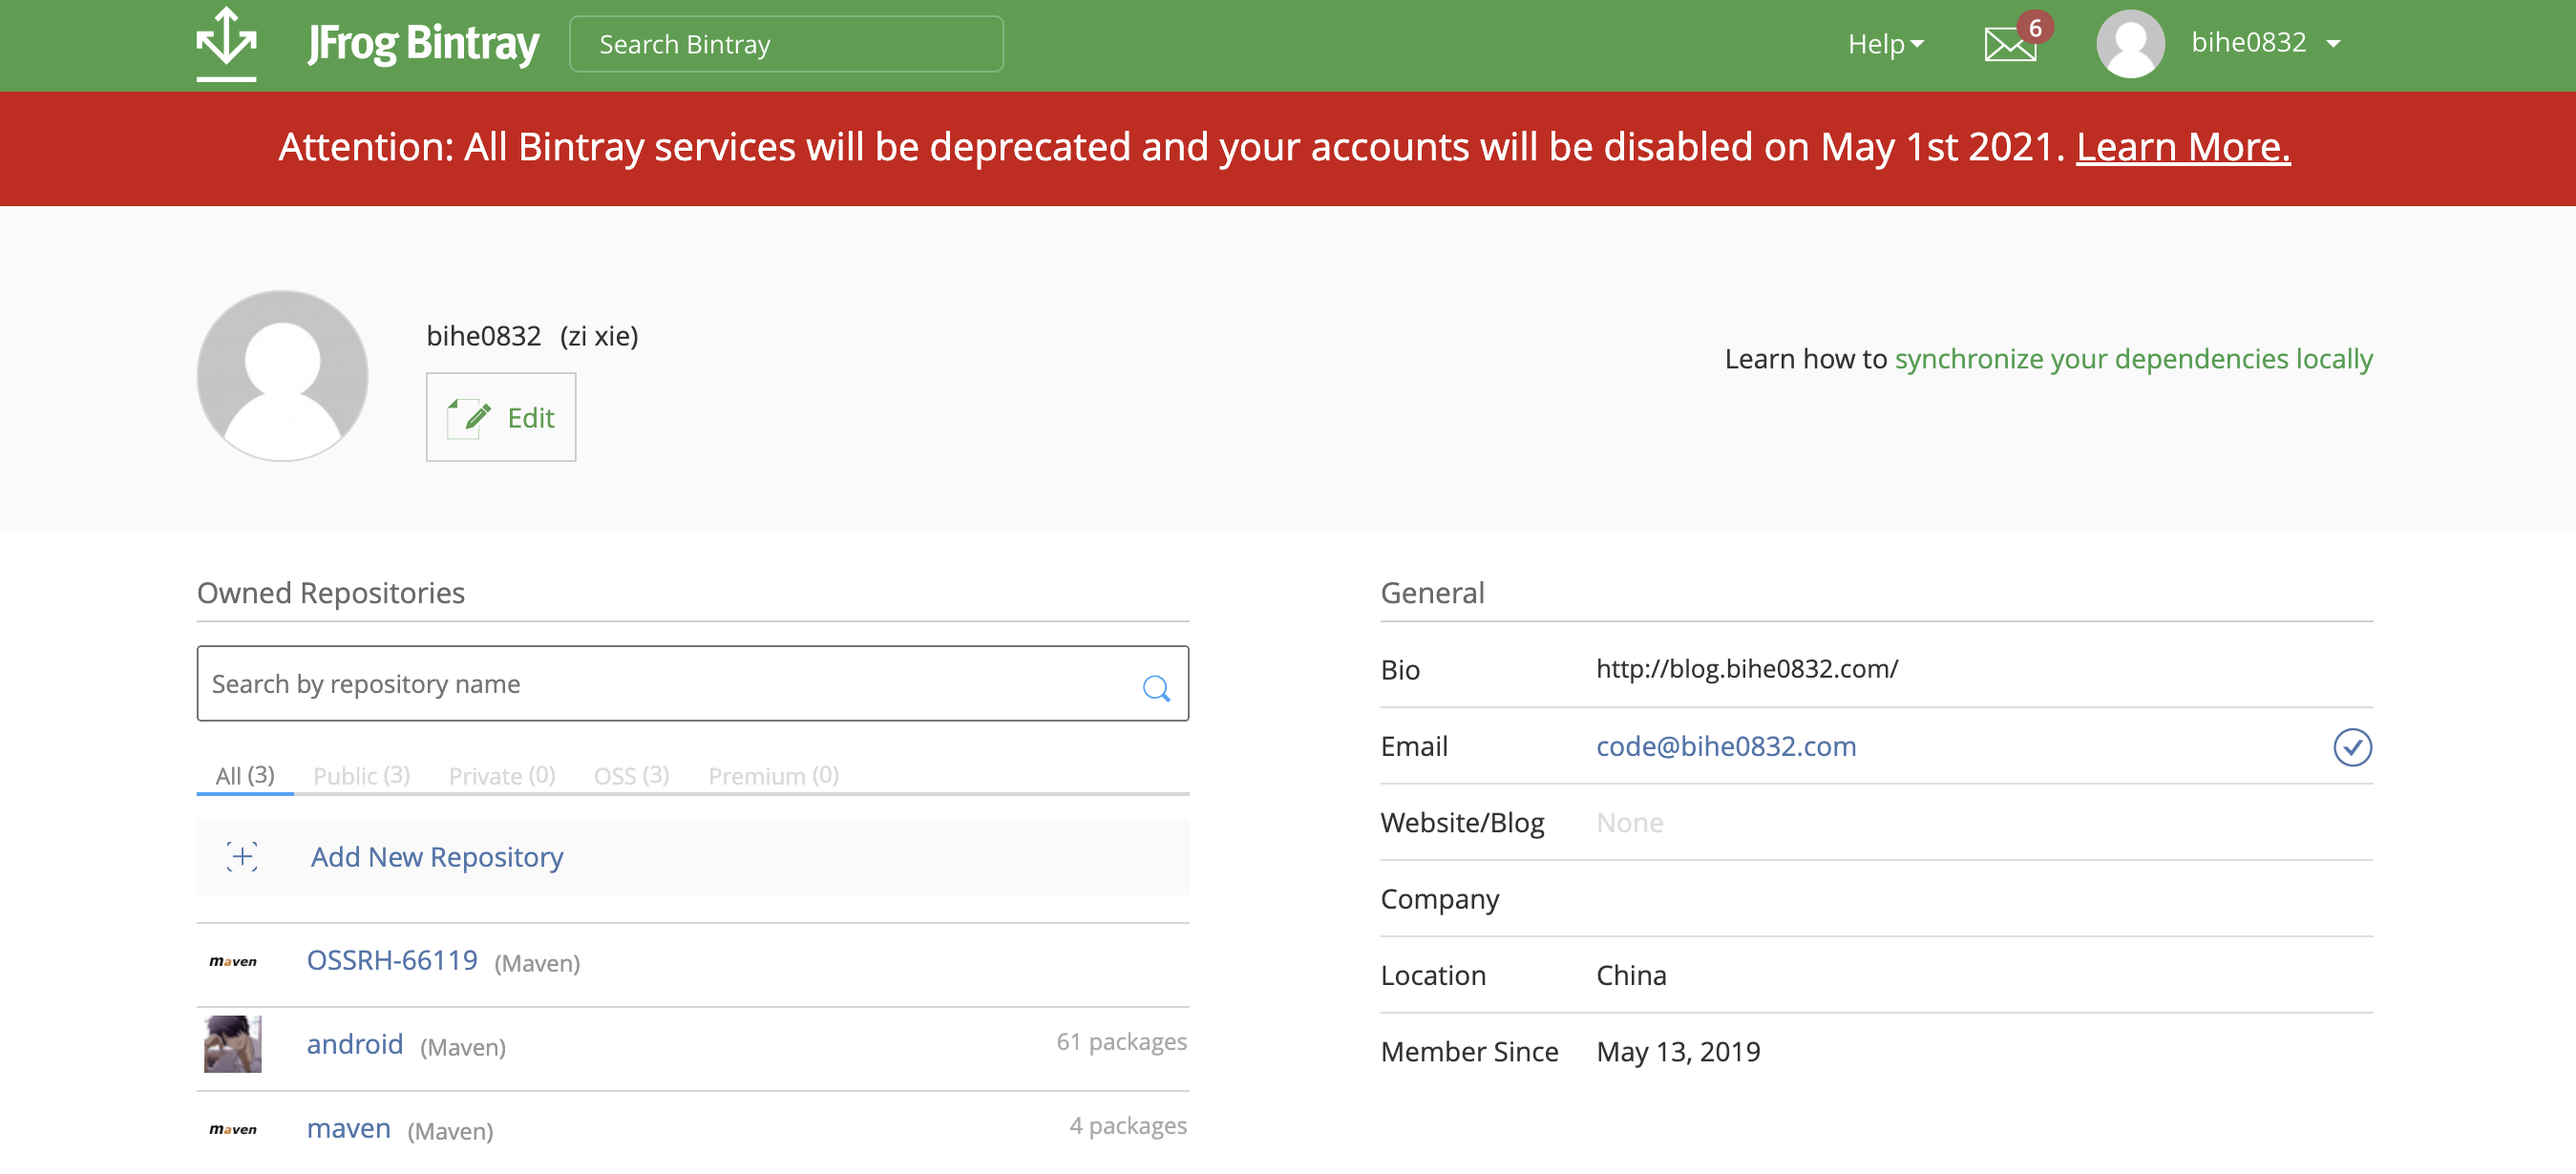
又红又粗必然是有大事,果然没想到他竟然要跑路了,核心内容就是:
UPDATE: To better support the community in this migration, JFrog has extended the JCenter new package versions submission deadline through March 31st 2021.
To clarify, the JCenter repository will keep serving packages for 12 months until February 1st 2022. Only the JCenter REST API and UI will be sunsetted on May 1st 2021.
之前觉得发布到 Maven Central 太麻烦,没想到最终还是逃不掉,因此开始着手迁移到 Maven Central ,考虑到遇到的人应该不少,简单整理下。这篇文章从头开始介绍怎么把开源代码发布到Maven Central,并在项目中使用。包括注册账号,发布,发布后使用以及发布中一些常见的问题。
前期准备
开源项目
你需要有已经开源的项目,并且项目已经编译通过,可以发布。为了方便介绍,我选择通过自己的开源项目AAF来介绍。项目地址:
https://github.com/bihe0832/AndroidAppFactory
Group Id
Jcenter对于 Group Id的归属没有强校验,Sonatype会要求你提供权属的真实性,例如使用:com.bihe0832.android;你需要证明你拥有 android.bihe0832.com 域名的所有权。怎么证明后面会介绍。
注册 Group Id
我当时申请 android.bihe0832.com 的信息可以参考:https://issues.sonatype.org/browse/OSSRH-66119
官网地址:
-
issues.sonatype.org:https://issues.sonatype.org/secure/Dashboard.jspa
这是一个基于 JIRA 的平台,如果没有账号,就注册一个,并不麻烦。注册成功之后,记下用户名和密码,后面还会用到
注册 Group Id:
-
提交申请
登录以后,点击上面的链接,进入网页,按照下图的指引,点击新建,只需要填写概要以下的信息即可,基本上主要是项目主页,项目源码和要注册的Group Id。
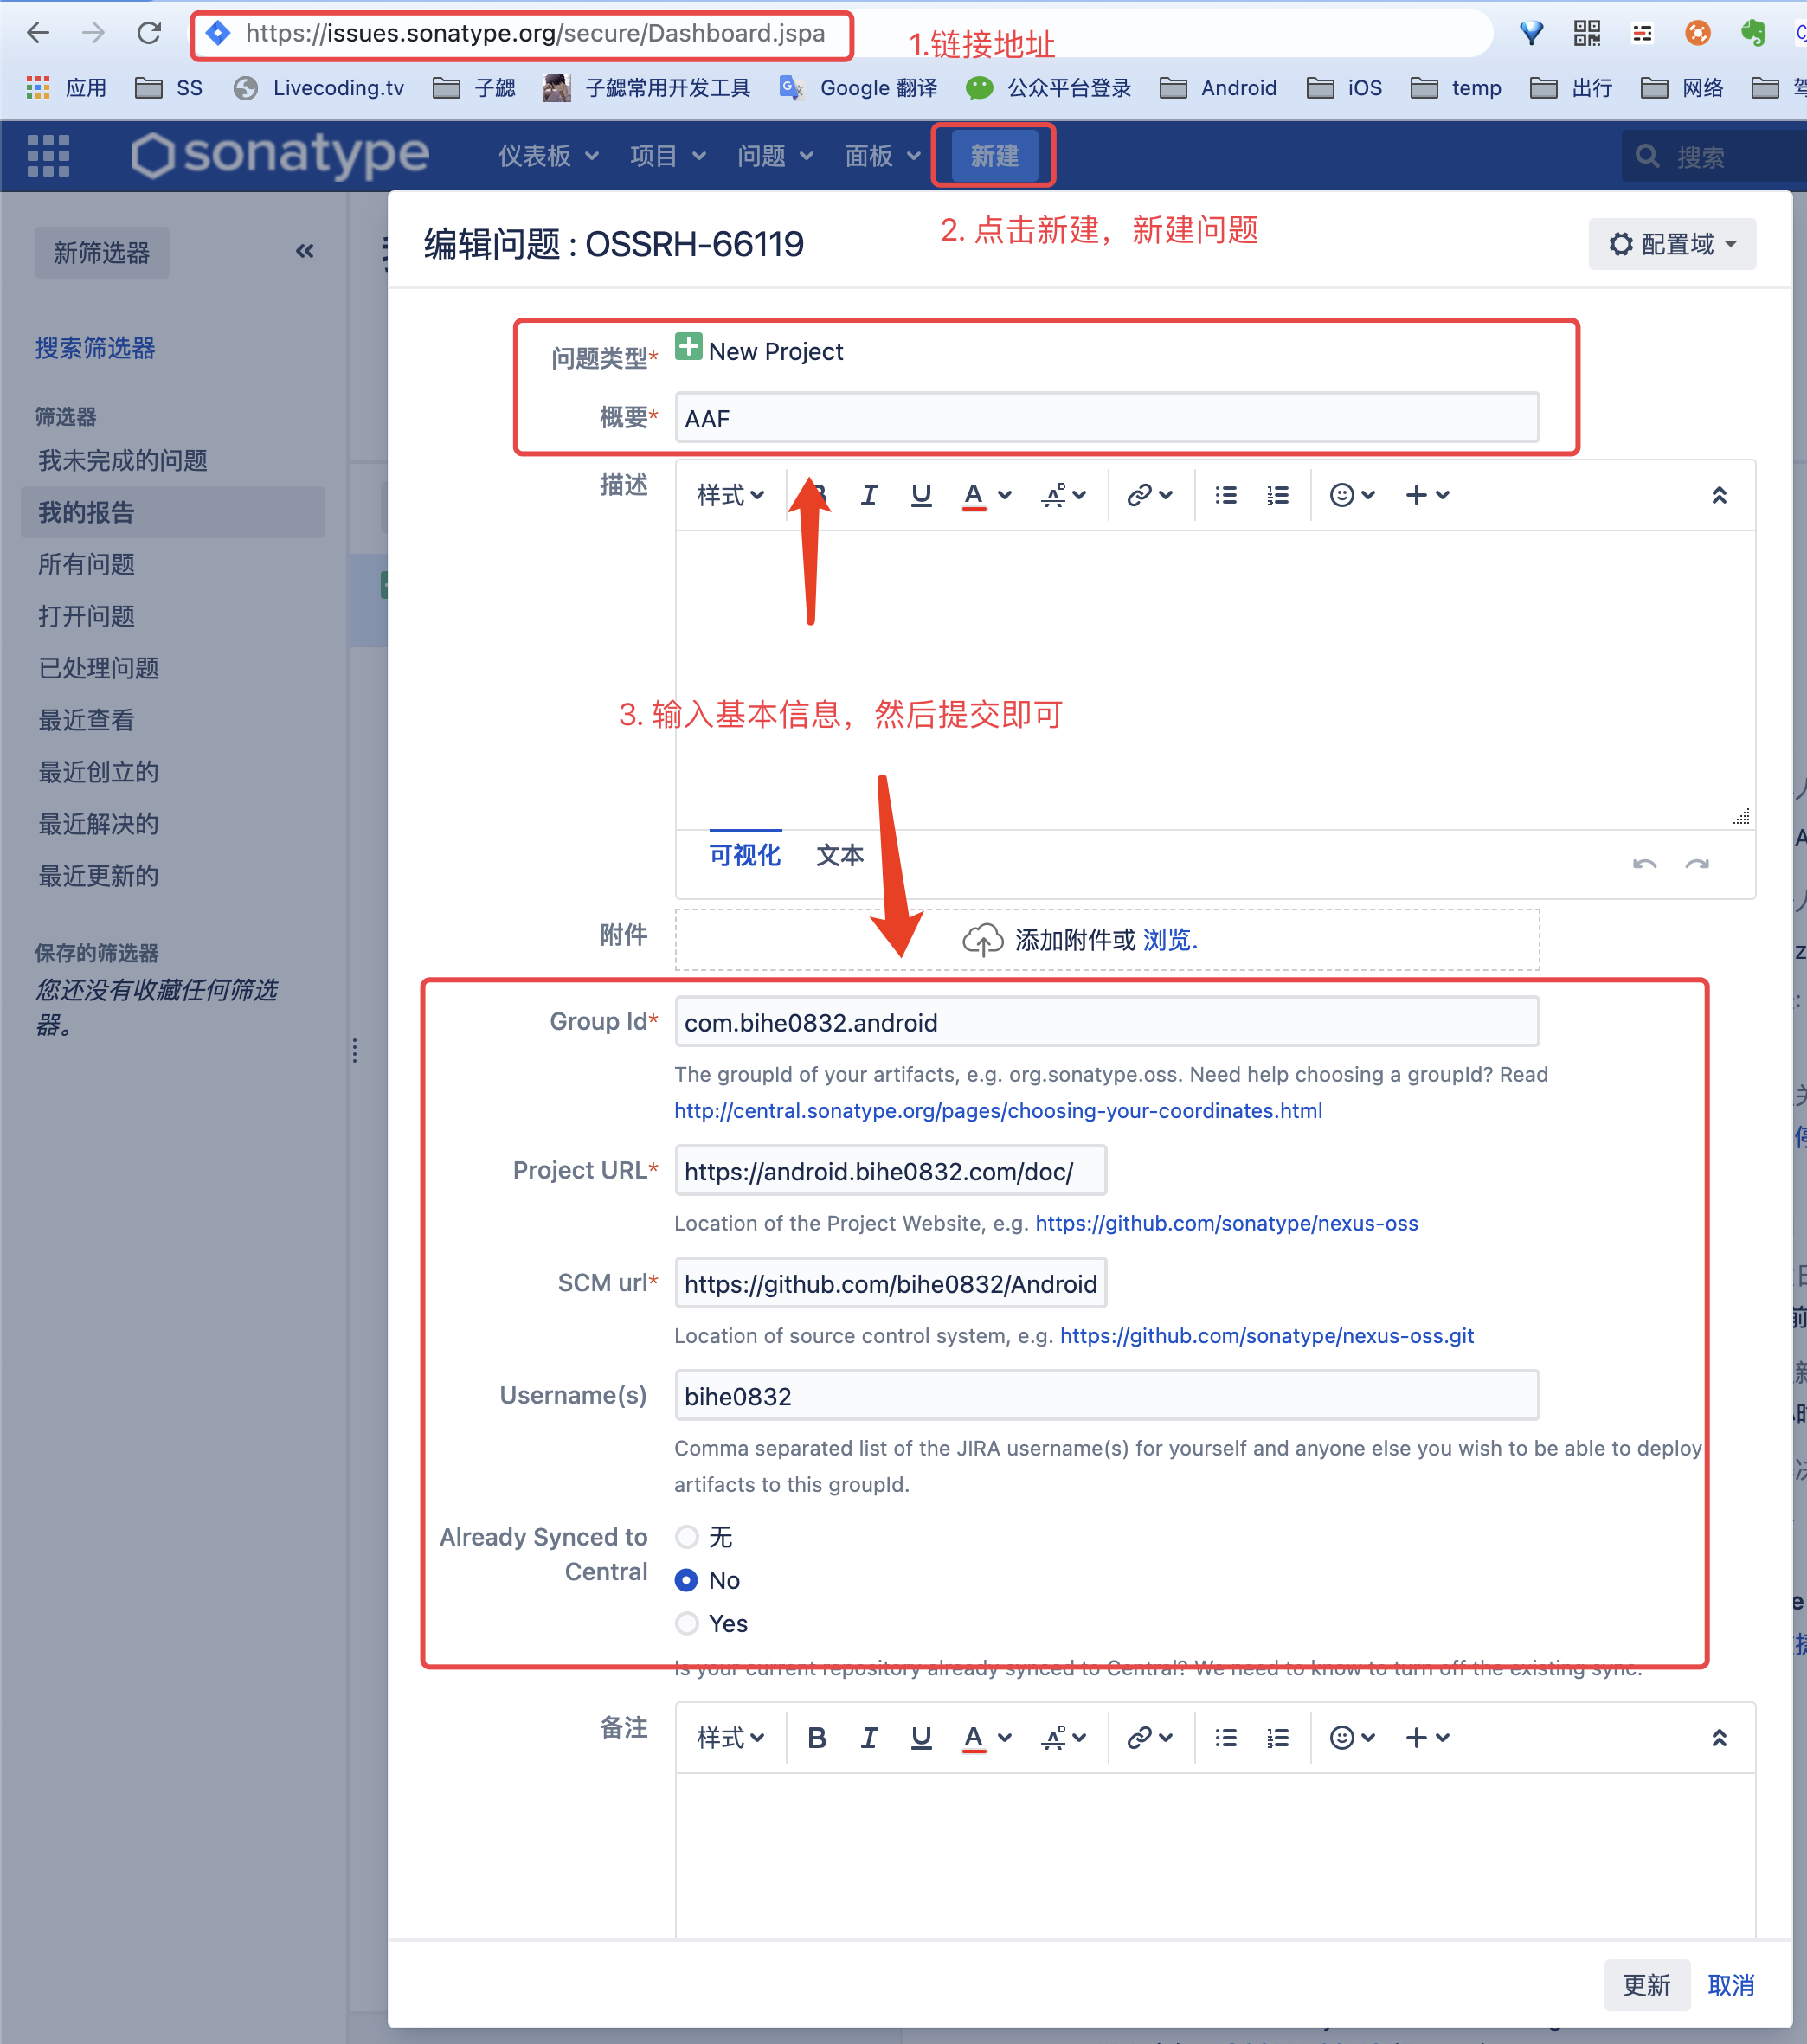
如果后续有信息需要修改,比如要修改Group Id,改完之后点击工单上方的“response”按钮,以通知平台已修改完毕。
-
验证域名的有效性
当申请提交以后,很快就会有官网账号,回复你,提醒你验证域名的有效性,例如:
Do you own the domain bihe0832.com? If so, please verify ownership via one of the following methods:
- Add a TXT record to your DNS referencing this JIRA ticket: OSSRH-66119 (Fastest)
- Setup a redirect to your Github page (if it does not already exist) You can find more information here: https://central.sonatype.org/pages/producers.html
If you do not own this domain, please read: http://central.sonatype.org/pages/choosing-your-coordinates.html You may also choose a groupId that reflects your project hosting, in this case, something like io.github.bihe0832 or com.github.bihe0832
这个操作也很简单,去你的域名解析规则里面增加一条指向 https://issues.sonatype.org/browse/OSSRH-66119 的 TXT 记录即可,例如:将 android.bihe0832.com 的 TXT 配置为 https://issues.sonatype.org/browse/OSSRH-66119
配置成功以后可以使用 dig 命令验证。例如:
 dig -t TXT android.bihe0832.com

 ; <<>> DiG 9.10.6 <<>> -t TXT android.bihe0832.com
 ;; global options: +cmd
 ;; Got answer:
 ;; >>HEADER<< opcode: QUERY, status: NOERROR, id: 30392
 ;; flags: qr rd ra; QUERY: 1, ANSWER: 1, AUTHORITY: 0, ADDITIONAL: 1

 ;; OPT PSEUDOSECTION:
 ; EDNS: version: 0, flags:; udp: 4000
 ;; QUESTION SECTION:
 ;android.bihe0832.com. IN TXT

 ;; ANSWER SECTION:
 android.bihe0832.com. 600 IN TXT "https://issues.sonatype.org/browse/OSSRH-66119"

 ;; Query time: 73 msec
 ;; SERVER: 10.11.56.23#53(10.11.56.23)
 ;; WHEN: Tue Mar 23 17:43:08 CST 2021
 ;; MSG SIZE rcvd: 108
当验证没有问题,就可以直接回复已完成,当官方验证没有问题,就会进入下一步
-
增加Jcenter 同步
这一步个人认为可以放弃,在域名验证没有问题以后,收到官网的回复:
Are you migrating from Jcenter? If so please create the empty repository in Bintray https://bintray.com/bihe0832/OSSRH-66119 as proof of ownership.
最开始有打算把 Jcenter 的代码也同步过来,因此就根据提示,前往 Jcenter 新建了名为OSSRH-66119 的 repository,后来发现Jcenter都要跑路了,其实这一步可以不做的。
-
发放Group Id
当上面的工作做完以后,继续回复issue,官网验证结束以后,就会收到下面的信息,并且开通对应仓库的权限:
com.bihe0832.android has been prepared, now user(s) bihe0832 can: Publish snapshot and release artifacts to https://s01.oss.sonatype.org Have a look at this section of our official guide for deployment instructions: https://central.sonatype.org/pages/ossrh-guide.html#deployment
Please comment on this ticket when you’ve released your first component(s), so we can activate the sync to Maven Central. Depending on your build configuration, this might happen automatically. If not, you can follow the steps in this section of our guide: https://central.sonatype.org/pages/releasing-the-deployment.html
至此,第一步,账号及Group Id就算申请通过了。
提交代码到 Sonatype Maven Central
配置gpg信息
gpg用于签署上传的 jar 或 aar 文件,这里介绍如何使用 iMac 生成gpg秘钥对,并发布到第三方
-
安装 gpg
如果没有安装gpg,使用brew安装。
➜ brew install gpg -
生成秘钥对
安装gpg后,使用命令生成秘钥对
➜ gpg --gen-key依次输入:用户ID 和邮箱,然后选择Okay,然后输入密码,即可生成秘钥对
-
查看公钥Id
在秘钥生成以后,通过下面的命令查看公钥id
 ➜  ~ gpg --list-key --keyid-format short
 ~/.gnupg/pubring.kbx
 -------------------------------
 pub   rsa3072/E6A1AD98 2021-03-23 [SC] [expires: 2023-03-23]
       C925167XXXXXXXXXXXXXXXXX6A1AD98
 uid         [ultimate] XXXXXXXXXX <XXXXXXXXXX>
pub rsa3072/E6A1AD98 2021-03-23 [SC] [expires: 2023-03-23] 里面,rsa3072后面的E6A1AD98就是公钥Id
-
发布公钥
上传公钥Id到公网,为了方便后续访问,我同时上传了多个公网:
➜ gpg --keyserver hkp://pgp.mit.edu --send-keys E6A1AD98 gpg: sending key 08587B8CE6A1AD98 to hkp://pgp.mit.edu ➜ gpg --keyserver hkp://keyserver.ubuntu.com --send-keys E6A1AD98 gpg: sending key 08587B8CE6A1AD98 to hkp://keyserver.ubuntu.com ➜ gpg --keyserver hkp://keys.gnupg.net --send-keys E6A1AD98 gpg: sending key 08587B8CE6A1AD98 to hkp://hkps.pool.sks-keyservers.net -
生成密钥环文件:
执行命令生成本地的加密私钥文件。
➜ gpg --export-secret-keys -o ~/.gnupg/secring.gpg -
配置gpg信息
在项目根目录的
gradle.properties添加gpg的配置信息,其中signing.secretKeyRingFile的值为上一步生成的私钥文件的绝对路径。例如:# gpg信息 signing.keyId=E6A1AD98 signing.password=XXXXXX signing.secretKeyRingFile=/secring.gpg
配置账号信息
-
获取Token
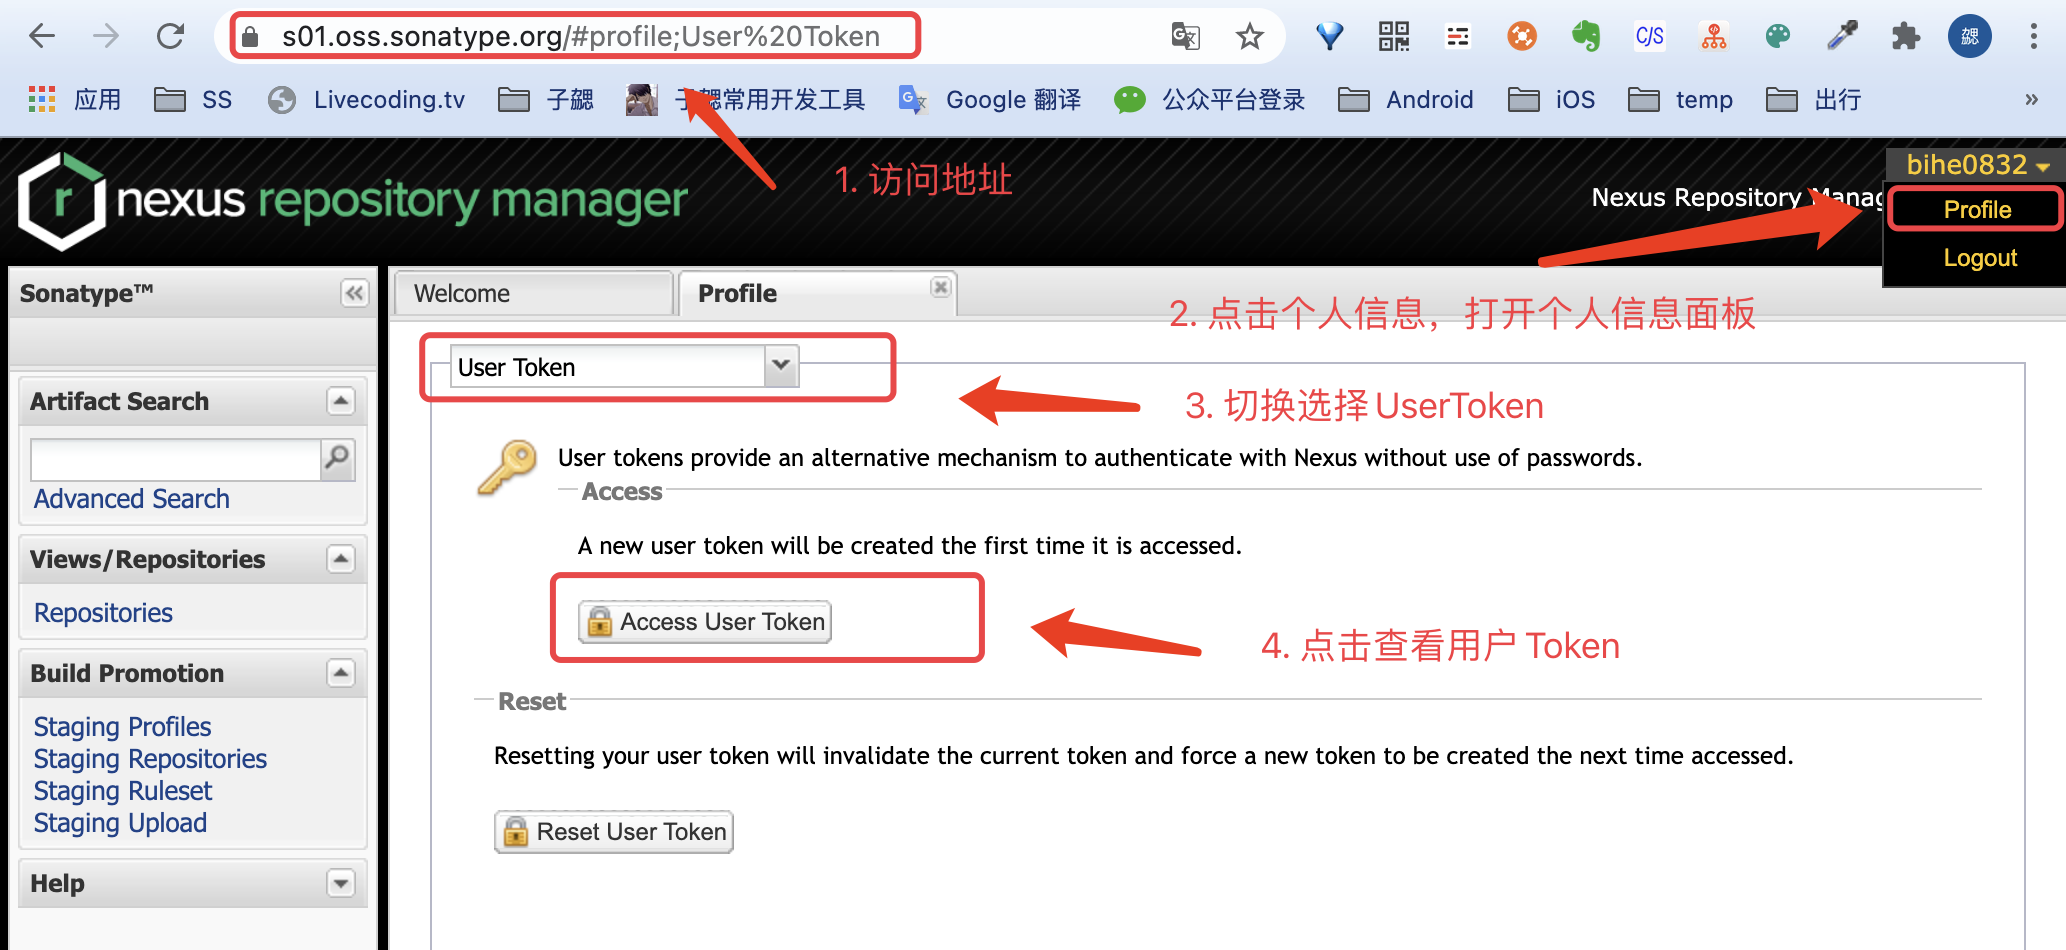
打开 https://s01.oss.sonatype.org
使用注册 Group Id是注册的sonatype 的账号和密码登录,按照下图的步骤,获取Token
-
配置Token信息
在项目根目录的
gradle.properties添加nexus Token的配置信息。例如:# nexus账号信息,也就是创建工单时的账号和密码 NEXUS_USERNAME=GTXXXXXEt NEXUS_PASSWORD=xjXXXXXXXXXXXXXXXXXXXXXXXXXXXXXXaqJG你也阔以不操作第一步,直接在这里配置你的 sonatype 的登录账号和密码
添加发布脚本
-
配置发布信息
添加开源项目的基本信息,上传脚本可以参考 https://github.com/bihe0832/AndroidAppFactory/build_aar.gradle
-
引入发布脚本
在需要发布的 Library 的 build.gradle 里面引入 build_aar.gradle即可,例如 AndroidAppFactory 的Framework ,对于Java 类型的 Library, 参考 AndroidAppFactory 的 RouterCompiler 的 build.gradle,还需要添加额外的几个Task
发布代码到 sonatype
在项目根目录运行命令,上传二进制包。例如:
./gradlew clean :Framework:uploadArchives
即可将二进制包发布到 sonatype
同步代码到 Maven Central
信息确认
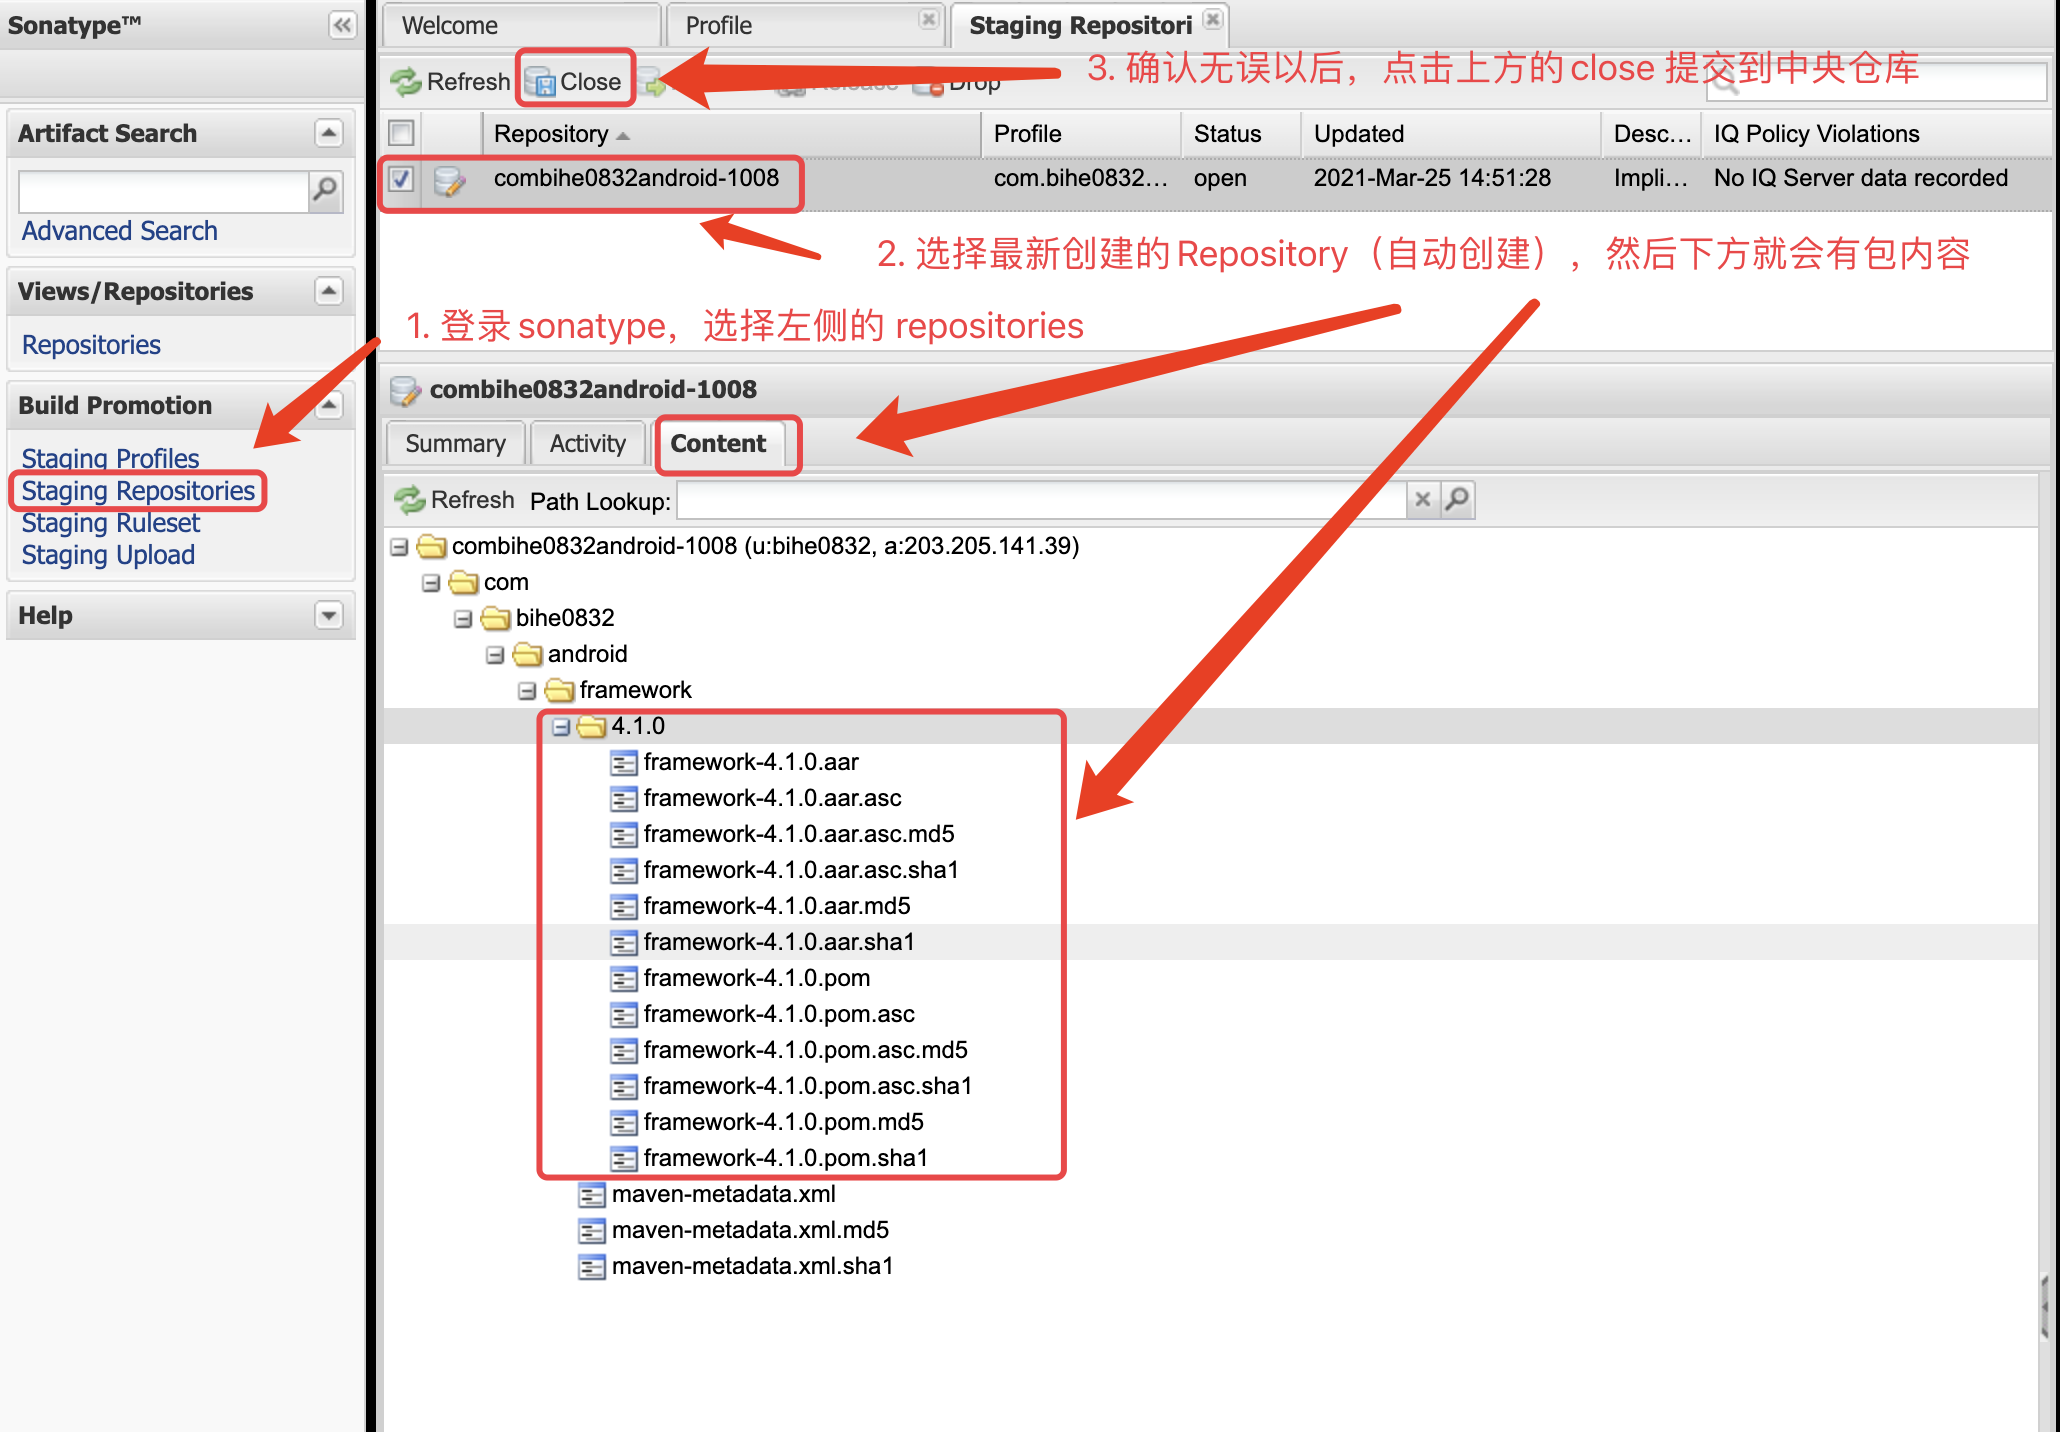
打开 https://s01.oss.sonatype.org 使用注册 Group Id是注册的sonatype 的账号和密码登录,按照下图的步骤,查看刚才新上传的代码
同步到 Maven Central
如果确认Content的信息正确,勾选点击上方的Close,提交申请
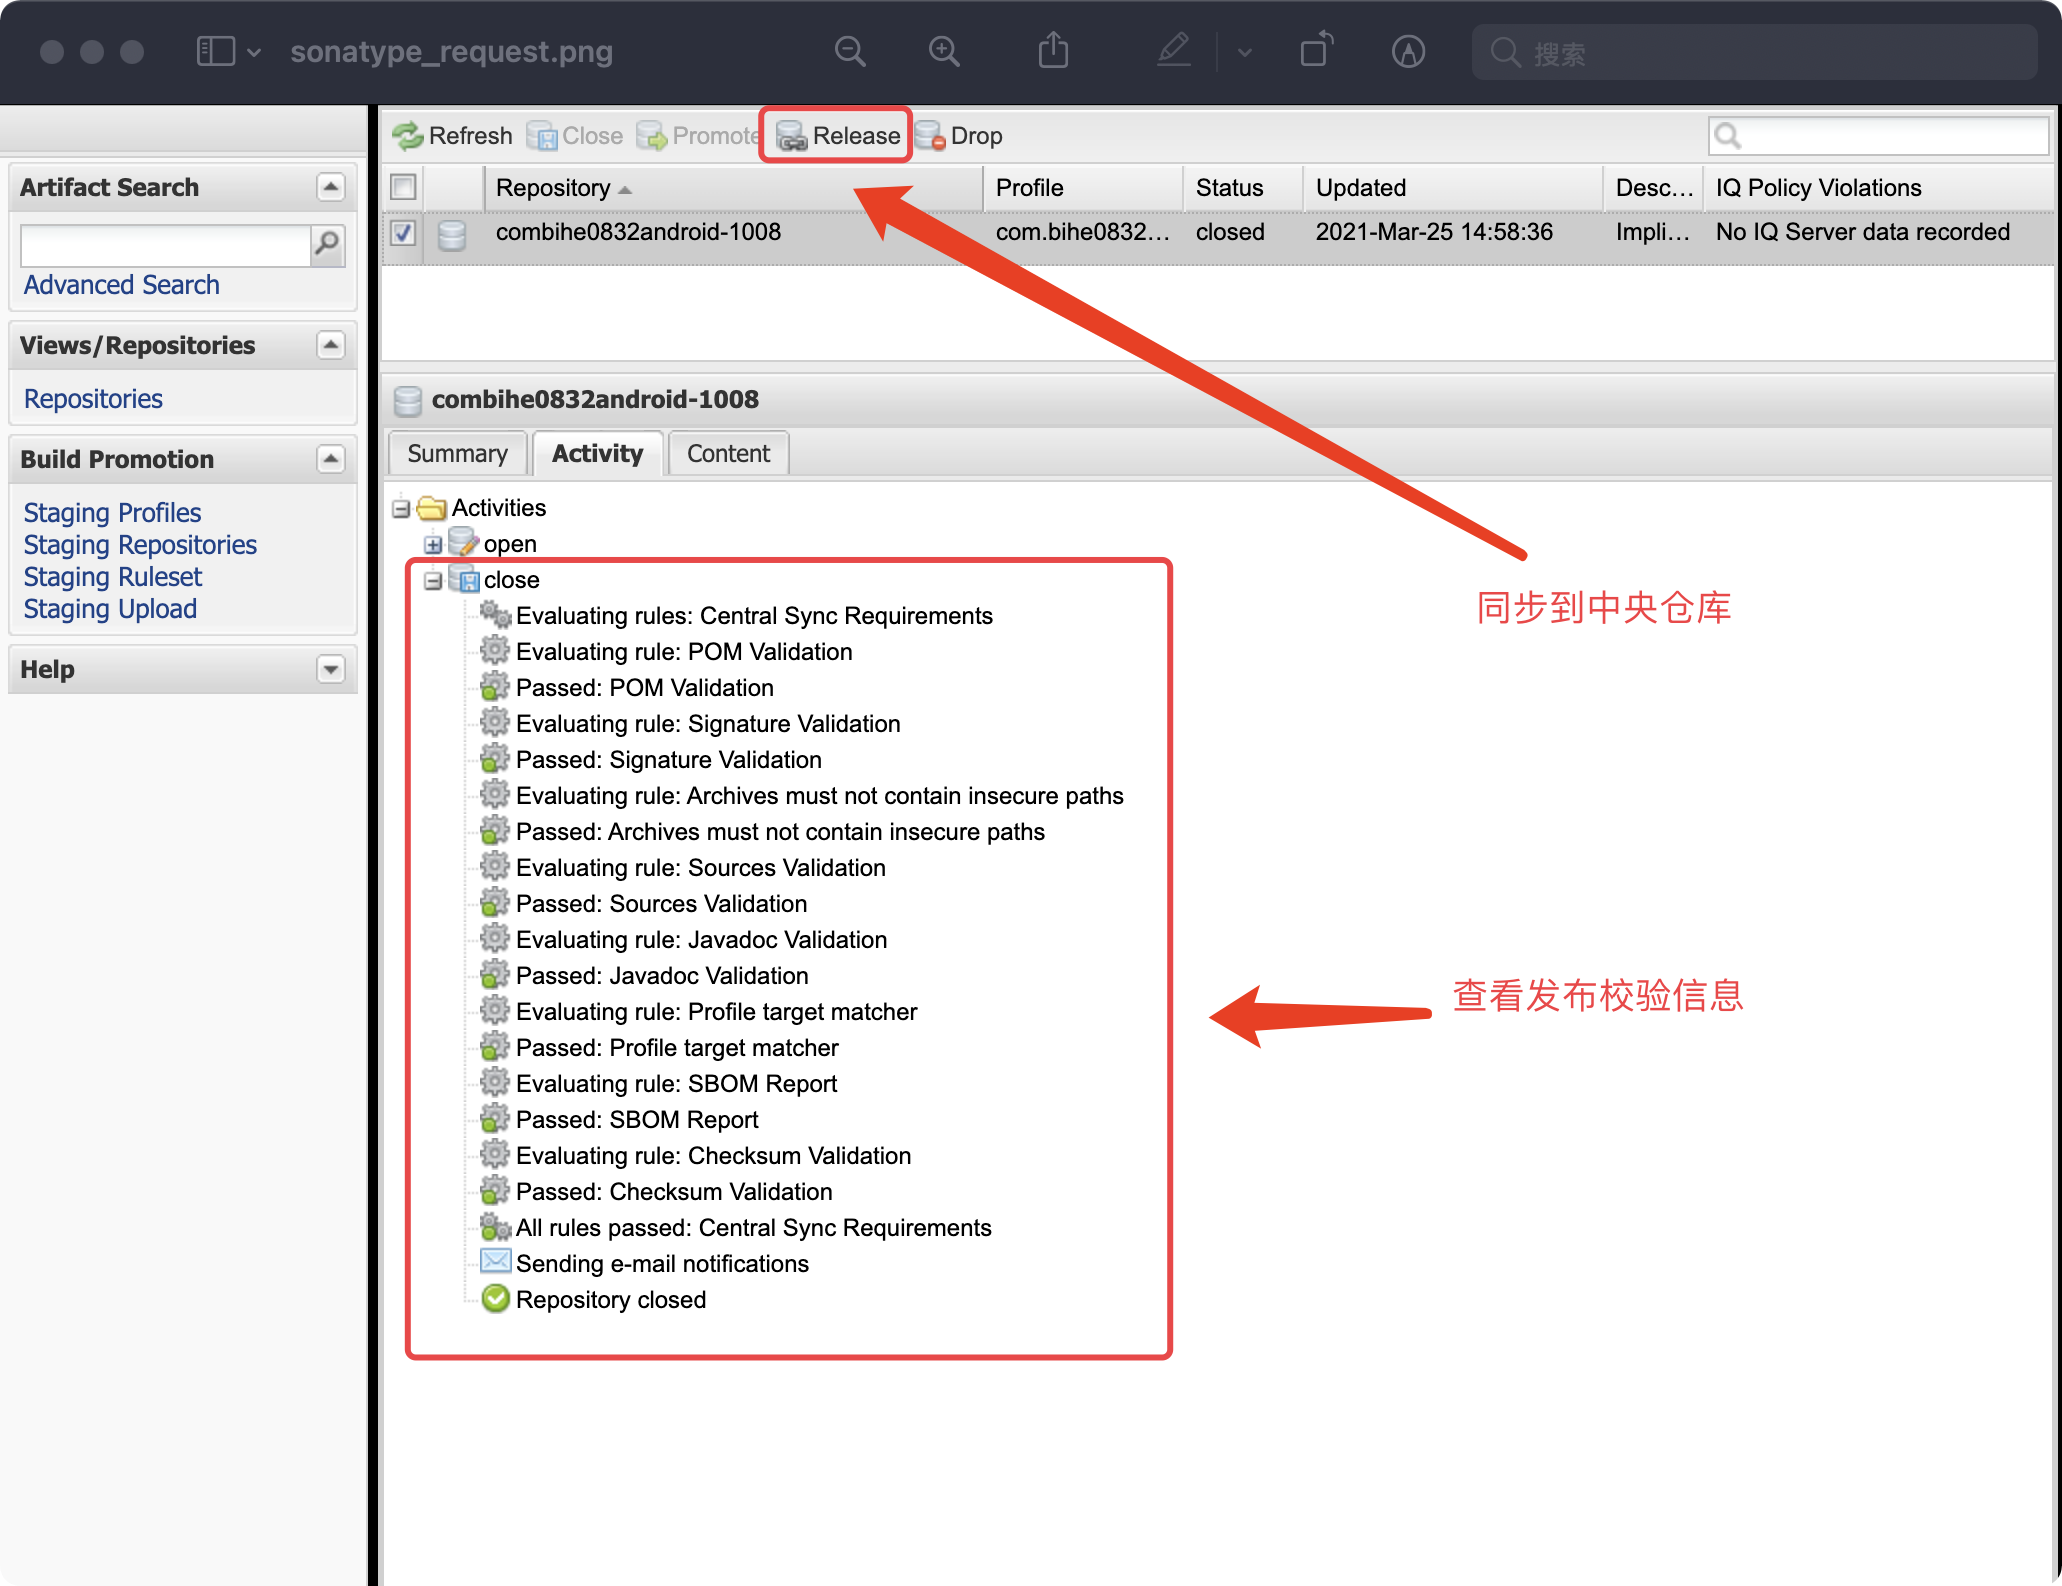
然后刷新页面,就可以在Activity查看信息审核的进度,如果失败了,这里会提示哪一步出错了,以及出错原因,根据原因解决问题,删了有问题版本,再次提交申请,如果审核通过了,上面的Release按钮会变为可点击,点击即可同步到中央仓库
当提交到中央仓库以后:
Central sync is activated for com.bihe0832.android. After you successfully release, your component will be published to Central https://repo1.maven.org/maven2/, typically within 10 minutes, though updates to https://search.maven.org can take up to two hours.
使用项目
此时其实我们的项目已经可以在代码中使用,在根目录添加开源库仓库的相关依赖:
buildscript {
    repositories {
        maven { url "https://s01.oss.sonatype.org/content/groups/public" }

    }
}

allprojects {
    repositories {
        maven { url "https://s01.oss.sonatype.org/content/groups/public" }

    }
}
在对应项目添加依赖,具体的依赖方法可以参考上图左下角:
compile 'com.bihe0832.test:utils-demo:1.0.0'
在同步10分钟左右,我们就可以通过 mavenCentral 引用了
常见问题:
-
提交代码报错,提示:failed to deploy artifacts: could not transfer artifact return code is: 401, reasonphrase: unauthorized.
请检查根目录build.gradle 里面配置用户名和API Key是否正确,一般是因为这个原因。


