终端开发
Android开发之FileProvider相关知识 Android 权限 及设置描述信息 局域网开启 Android ADB 无线调试 安卓开发那些事之开发规范 安卓组件化之组件通信及拦截 安卓开发那些事之版本管理 安卓组件化之持续集成与自动构建 安卓组件化之组件调试和运行 安卓组件化之组件管理(导入、依赖、升级) 安卓组件化之框架设计 安卓开发那些事总纲 Android Textview 对HTML 的支持 appium 爬坑之基于 Chromedriver 测试 Android webview Linux 搭建 Android 编译构建环境 appium爬坑之iMac上基于appium多设备并发测试 appium爬坑之iMac上appium环境搭建及使用真机测试Android项目简介 H5页面通过指定Schema拉起Android应用 Android JSBridge简介 Gradle插件开发系列之发布gradle插件到开源库 Gradle插件开发系列之开发第一个gradle插件 Gradle插件开发系列之gradle插件调试方法 Gradle插件开发系列之总纲 一款检查Gradle依赖配置是否冲突的插件 记一次升级Android Gradle Plugin后databing编译报错填坑经历 iMac上 Xcode 相关设置及常见问题 iOS开发 -- 首次使用Xcode运行iOS项目代码 使用Android Studio开发可独立运行(runnable)混淆过的Jar程序 Android安装包精简系列之资源精简 Android安装包精简系列之图片优化 Android安装包精简系列之为什么要优化精简安装包 Android安装包精简系列(总纲) Android安装包精简系列之图标转字体 Gradle 相关资料汇总 Android编译常见错误解决 Android编译编译速度提升 终端基于gradle的开源项目运行环境配置指引 制作终端产品演示的gif 一个关于APK Signature Scheme v2签名的神奇bug定位经历 如何随apk一起打包并使用SQLite SDK热更之gradle插件(如何在SDK代码中自动插桩及如何生成补丁包) 关于Android的APK Signature Scheme v2签名相关的资料汇总 封装HttpURLConnection实现的简单的网络请求库 一款基于Java环境的读取应用包名、签名、是否V2签名等基本信息的工具 Android的APK Signature Scheme v2签名及一款基于Java环境的校验工具介绍 如何使用Eclipse开发可执行Jar程序,并生成混淆过的jar程序 Android 相关的学习资料整理(持续更新) macOS(Sierra 10.12)上Android源码(AOSP)的下载、编译与导入到Android Studio Android开发常用命令备忘 Google也看不下去被玩坏的悬浮窗了么? Android开发常用工具资源 SDK热更系列之概述(持续整理编辑中~) SDK热更系列之SDKHotfix待优化点 Android 终端开发相关的一些神图(持续更新) SDK热更系列之Demo项目介绍概述 SDK热更系列之Demo体验方法 SDK热更系列之如何获取应用在当前设备上的so对应的指令集 Gradle Android插件使用的中那些特别注意的点 Experimental Plugin User Guide(From Android Tools Project Site) 基于Android Studio使用gradle构建包含jni以及so的构建实例 基于Instrumentation框架的自动化测试 - Android自动化测试系列(四) Instrumentation框架介绍-Android自动化测试系列(三) 关于终端设备的设备唯一性的那些事之MAC地址 关于终端设备的设备唯一性的那些事之IMEI Android 检查应用是否有root权限 ant常见错误解决方案 Gradle介绍 iMac上Android Studio 相关设置及常见问题 ADB命令系列之再说ADB 再看Android官方文档之分享 再看Android官方文档之Fragment&数据保存 再看Android官方文档之Activity&Intent 再看Android官方文档之ActionBar和兼容性 ADB命令系列之 adb shell input(Android模拟输入)简单总结 再看Android官方文档之建立第一个APP Android开发调试常用工具 ANR(网络资料整理) Java参数引用传递引发的惨案(又一次Java的String的“非对象”特性的踩坑经历) android.view.WindowManager$BadTokenException,Unable to add window Android签名校验机制(数字证书)及命令行获取 keystore 公钥等信息 Robotium二三事-Android自动化测试系列(二) Robotium介绍-Android自动化测试系列(一) Android开发中遇到的那些坑 Eclipse使用中部分经验总结 Android中关于Nativa编译(NDK、JNI)的一些问题 Android简单实现的多线程下载模块 Android内存耗用之VSS/RSS/PSS/USS ADB命令系列之 Advanced Command URL编码中的空格(编码以后变为+) Android MD5后 bye数组转化为Hex字符串的坑(记一次为女神排忧解难的经历) Android学习之路 ADB命令系列之 Base Command Android Log的那些坑…………开发工具
Linux JDK 安装、卸载、路径查看 替换Jcenter,发布开源代码到 Sonatype Maven Central 使用 gitstats 分析代码仓库 使用 Jekyll 搭建技术博客并部署到 CentOS 服务器 开发中常用的文档管理、云端笔记等效率工具介绍 iMac(OS X)常用图片处理工具介绍 使用 Octopress 搭建技术博客并使用腾讯云静态网站托管 使用腾讯云静态网站托管个人博客 使用 Jekyll 搭建技术博客 iMac上安装Python2.7 和 Python3 iMac 使用自带的 Apache 启用本地web服务 发布开源代码到jcenter Gradle环境变量那些事 iMac搭建jekyll本地环境 iMac(OS X)开发和使用中经验汇总(持续更新) iMac配置基于crontab的定时任务 iMac配置支持读取NTFS硬盘 新iMac机器装机及开发环境搭建攻略 git常用命令整理(已包括branch、tag等持续更新~) iMac使用过程中的简单故障解决 iMac上RubyGems相关的问题汇总 开发中常用的一些Chrome插件介绍 iMac(OS X)日常开发中各种代理设置方法汇总(shell、Android Studio、gem、npm) Markdown格式优化及使用技巧 iMac下制作含透明度图片及判断图片透明度 iMac(OS X)中设置大小写敏感的分区并切换 Linux & MacOS中一些常用命令备忘 iMac(OS X)搭建私有maven仓库,提供Nexus Responsitory镜像 iMac(OS X)El Capitan 更新遇到的那些坑 vi常用命令 iMac(OS X)常用开发工具介绍 iMac(OS X)不可或缺的套件管理器 —— Homebrew 开发环境通用设置 windows中一些常用命令备忘 问题定位之快速模拟请求 Ant中的SVN 使用 Markdown语法简介 SVN 常用命令标签
总结 8
web 9
资源 4
android 50
adb 6
bug 7
常用工具 8
工具 30
SDK 22
Android 13
个人作品 7
测试 7
iMac 13
gradle 7
旅行 8
tags 53
apk 5
自动 3
安卓组件化之组件通信及拦截
「 终端开发 」 —— 2020年08月24日
这篇文章主要总结了我们基于路由的组件通信怎么设计的,以及怎么基于路由处理通用拦截及页面返回等逻辑。目前路由实现相关的代码,我已经整理开源,可以参考源码:https://github.com/bihe0832/AndroidAppFactory
路由能力介绍
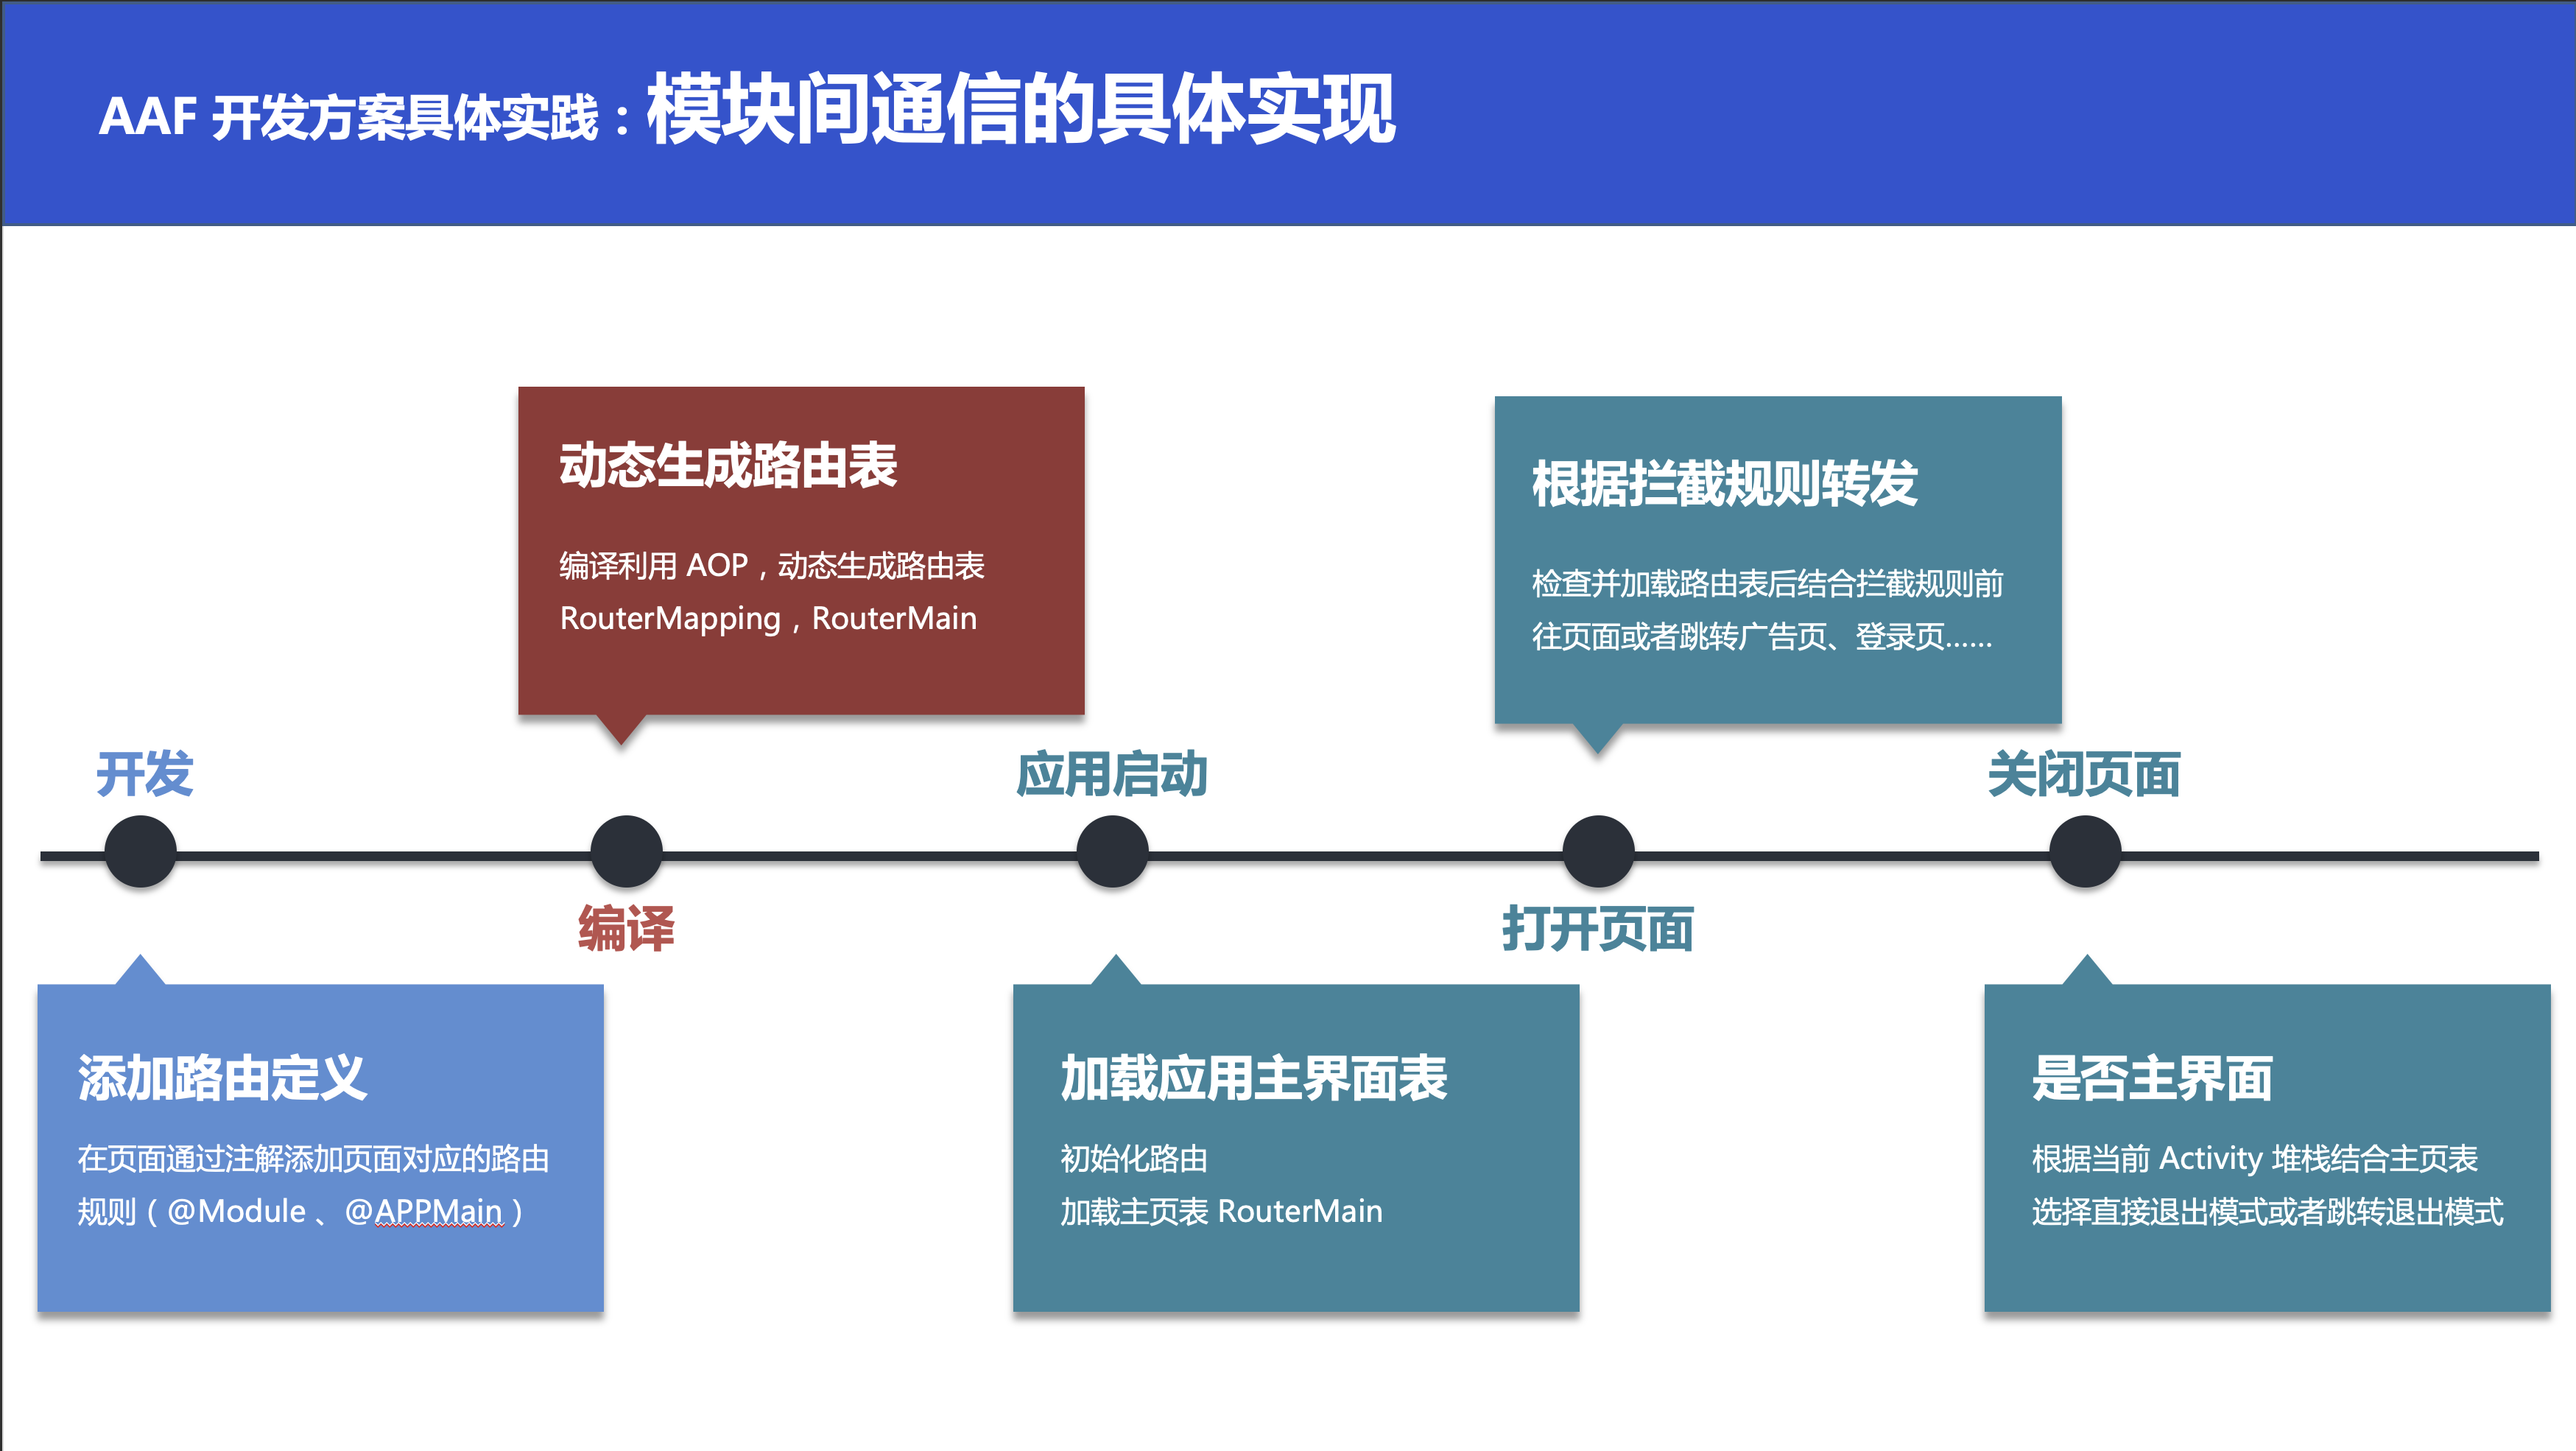
在考察了多个路由组件以后,结合我们的场景需求,基于 ActivityRouter https://github.com/mzule/ActivityRouter 重构了我们的路由组件。组件主要解决几个问题:
-
为了统一内外部跳转,页面路由组件使用标准的URL格式,每个页面的路由透传字段由自己维护
-
为了方便开发,目前所有路由通过注解配置,编译过程中会通过注解动态生成代码,构建对应的路由规则。
-
为了保证页面回退最终回退到主页面,增加了主页面的注解及处理
路由实现

-
路由表生成
路由表的生成使用注解动态生成代码,部分代码如下
  public boolean process(Set<? extends TypeElement> annotations, RoundEnvironment roundEnv) {
          debug("process apt with " + annotations.toString());
          if (annotations.isEmpty()) {
              return false;
          }

          MethodSpec.Builder initMethod = MethodSpec.methodBuilder("init").addModifiers(Modifier.PUBLIC, Modifier.FINAL, Modifier.STATIC);
          Set<? extends Element> mainList = roundEnv.getElementsAnnotatedWith(APPMain.class);
          debug("process mainList: " + mainList.size());
          boolean hasMain = false;
          if (mainList != null && mainList.size() > 0) {
              for (Element tempModule: mainList) {
                  ClassName className = ClassName.get((TypeElement) tempModule);
                  APPMain annotation = tempModule.getAnnotation(APPMain.class);
                  if(null != annotation){
                      initMethod.addStatement(ROUTER_PACKAGE_NAME + ".RouterMappingManager.addMain(" +className + ".class);");
                      hasMain = true;
                  }
              }
          }

          if(hasMain){
              TypeSpec routerInit = TypeSpec.classBuilder("RouterInit")
                      .addModifiers(Modifier.PUBLIC, Modifier.FINAL)
                      .addMethod(initMethod.build())
                      .build();
              try {
                  JavaFile.builder(STUB_PACKAGE_NAME, routerInit)
                          .build()
                          .writeTo(filer);
              } catch (Exception e) {
                  e.printStackTrace();
              }
          }

          ArrayList<String> modulesNameList = new ArrayList<>();
          Set<? extends Element> moduleList = roundEnv.getElementsAnnotatedWith(Module.class);
          debug("process moduleList: " + moduleList.size());
          if (moduleList != null && moduleList.size() > 0) {
              for (Element tempModule: moduleList) {
                  String moduleName = "RouterMapping";
                  Module annotation = tempModule.getAnnotation(Module.class);
                  moduleName = moduleName + "_" + annotation.value();
                  debug("process moduleName: " + moduleName);
                  if(!modulesNameList.contains(moduleName)){
                      modulesNameList.add(moduleName);
                  }else{
                      throw new RuntimeException("Module "+ moduleName + "has been add");
                  }
              }
          }
          debug("generate default RouterInit");
          return handleRouters(modulesNameList, roundEnv);
      }

      private boolean handleRouters(ArrayList<String> modulesNameList, RoundEnvironment roundEnv) {
          for (String moduleName:modulesNameList ) {
              if(!handleRouter(moduleName,roundEnv)){
                  return false;
              }
          }
          return true;
      }

      private boolean handleRouter(String genClassName, RoundEnvironment roundEnv) {
          Set<? extends Element> elements = roundEnv.getElementsAnnotatedWith(Module.class);

          MethodSpec.Builder mapMethod = MethodSpec.methodBuilder("map")
                  .addModifiers(Modifier.PUBLIC, Modifier.FINAL, Modifier.STATIC)
                  .addCode("\n");

          for (Element element : elements) {
              Module router = element.getAnnotation(Module.class);
              ClassName className = ClassName.get((TypeElement) element);
              mapMethod.addStatement(ROUTER_PACKAGE_NAME + ".RouterMappingManager.getInstance().addMapping($S, $T.class)", router.value(), className);
              mapMethod.addCode("\n");
          }
          TypeSpec routerMapping = TypeSpec.classBuilder(genClassName)
                  .addModifiers(Modifier.PUBLIC, Modifier.FINAL)
                  .addMethod(mapMethod.build())
                  .build();
          try {
              JavaFile.builder(STUB_PACKAGE_NAME, routerMapping)
                      .build()
                      .writeTo(filer);
          } catch (Throwable e) {
              e.printStackTrace();
          }
          return true;
      }
  }
生成的某个模块的路由表事例如下:
  public final class RouterMapping_main {
    public static final void map() {
      com.bihe0832.android.lib.router.RouterMappingManager.getInstance().addMapping("test", TestHttpActivity.class);
      com.bihe0832.android.lib.router.RouterMappingManager.getInstance().addMapping("main", MainActivity.class);
    }
  }
路由跳转
路由跳转有两步,第一步根据路由去路由表匹配对应的路由规则;第二步根据路由规则打开对应的页面。
具体的,在匹配规则时,会先去路由总表查看是不是存在,如果不存在,再去尝试将这个路由所属某块的路由表加载到总表。
根据路由表打开页面,其实就是构造一个startActivity的过程
路由拦截
如果对于一些页面,在打开前有前置条件,例如是不是已经登录,或者对于特权相关的,需要有权限才能跳转的,在没有路由之前添加就会很麻烦,在基于路由以后,我们可以在打开路由之前添加拦截规则,拦截规则处理结束以后再继续跳转。

相关代码:
object RouterInterrupt {

    val TAG = "Router->"
    interface RouterProcess {
        //是否需要登录
        fun needLogin(uri: Uri): Boolean
        //是否需要拦截
        fun needInterrupt(uri: Uri): Boolean
        //拦截后操作
        fun doInterrupt(uri: Uri): Boolean
    }

    @Synchronized
    fun init(process: RouterProcess) {
        RouterContext.setGlobalRouterCallback(object : RouterContext.RouterCallback {
            override fun afterOpen(context: Context, uri: Uri) {
                Logger.d(TAG,":afterOpen ->$uri")
            }

            //跳转前拦截
            override fun beforeOpen(context: Context, uri: Uri): Boolean {
                Logger.d(TAG,":beforeOpen ->$uri")
                return if (process.needInterrupt(uri) || process.needLogin(uri)) {
                    intercept(uri, process)
                } else {
                    false
                }
            }

            override fun error(context: Context, uri: Uri, e: Throwable) {
                Logger.d(TAG," :error ->$uri")
            }

            override fun notFound(context: Context, uri: Uri) {
                Logger.d(TAG," :notFound ->$uri")
            }
        })
    }


    //拦截处理结果
    fun intercept(uri: Uri, process: RouterProcess): Boolean {
        Logger.d(TAG,":beforeOpen uri ->$uri")
        return if (process.needLogin(uri)) {
            return if (Login.isLogin()) {
                //已登录,检测是否额外拦截
                if (process.needInterrupt(uri)) {
                    process.doInterrupt(uri)
                } else {
                    false
                }
            } else {
                //未登录,先登录,再重放
                Login.doActionWithLogin({
                    Routers.open(Context.applicationContext, uri)
                }, { })
                true
            }
        } else {
            //无需登录,直接拦截
            process.doInterrupt(uri)
        }
    }
}
页面返回
由于接入路由以后,存在外部跳转的场景,而外部跳转会直接进入对应路由页面。
当用户关闭该页面以后,如果不作处理就退出了应用。但是合理的效果应该是非应用主页面回退到应用的主页面,应用主页面弹出应用退出的确认。
页面打开之前我们通过路由拦截实现。而回退则只能通过分析当前的Activity堆栈实现。
我们在每次页面返回的时候会去获取当前任务栈本应用相关的页面,然后根据路由表生成的应用主页面表根据规则完成对应业务逻辑。回退时处理的代码如下:
fun BaseActivity.onBackPressedSupportAction(autoExit: Boolean) {
    val am = getSystemService(ACTIVITY_SERVICE) as ActivityManager
    val taskInfoList = am.getRunningTasks(Int.MAX_VALUE)
    var topActivity = ""
    var activityNum = 0
    for (i in taskInfoList.indices) {
        if (taskInfoList[i].baseActivity.packageName.equals(packageName, ignoreCase = true)) {
            if (TextUtils.isEmpty(topActivity)) {
                topActivity = taskInfoList[i].topActivity.className
            }
            activityNum += taskInfoList[i].numActivities
        } else if (i > 0) {
            break
        }
    }

    if (activityNum == 1) {
        if (isMain(topActivity)) {
            if (autoExit) {
                Context.exitAPP(null)
            } else {
                onBack()
            }
        } else {
            finishAndGoMain()
        }
    } else {
        if (isMain(topActivity)) {
            if (autoExit) {
                Context.exitAPP(null)
            } else {
                onBack()
            }
        } else {
            onBack()
        }
    }
}
路由测试
终端测试总是很方便,但是一旦和H5结合,尤其H5的页面还没开发好的时候,路由联动测试就比较麻烦。顺手撸了一个工具。对应链接为:https://blog.bihe0832.com/android_schema.html


